How About ‘Dem Apples Galette

apple-gelette-homemade-fresh

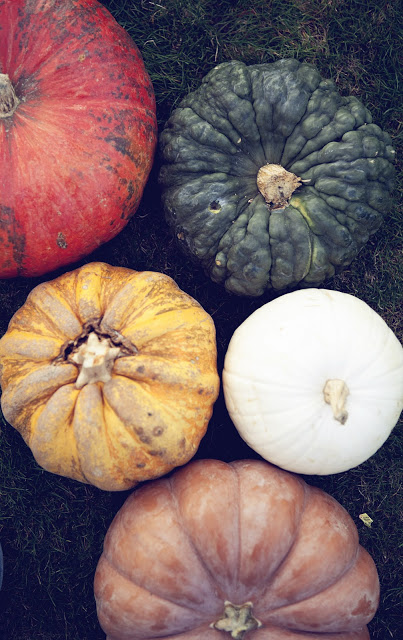
Something about autumn triggers an innate need to bake something, anything. Combine that with apple season and the internets are bursting with apple baked goods. The most quintessential of all apple baked goods is apple pie. We decided to take a more free form approach and make an apple galette, which is essentially a pie baked on a baking instead of a pie pan. The advantages of a galette over a pie are that it is easier to transfer the pie dough to a baking sheet compared to a pie pan, and it is easier to serve and most importantly to eat (kinda like pizza).

We decided to make Jacques Pepin’s country Country Apple Galette. We liked the simplicity of the filling, just apples, sugar, honey, and cinnamon. It allows the flavor of the apples to shine. However his recipe calls for making the dough in a food processor, and that just did not sit right with us. I know if a food processor is good enough for Jacques, it should be good enough for us amateurs. However, the lure of the food processor pie crust is not all it’s cracked up to be. When you use a food processor, it’s much easier to over incorporate the fat into the flour; I know this from past crust fails. That being said, handmade pie dough does not have a reputation for being easy to make either.  There is the still the danger of over working the dough and letting the fat warm up. We looked at a few different crust recipes and ultimately decided to use Bon Appétit’s Flakiest Pie Crust. The method is described as “foolproof” and a “blow your-mind technique for the best damn all-butter crust”.  We were sold.  It is, to date my best pie crust making experience. However, we did have to put it back into the fridge mid rolling out, but that could also have to do with the fact that we had to pause for a few pictures. Also, it was pretty fun to work the butter into the dry ingredients with our hands.

rolling-pie-dough        fresh-michigan-golden-delicious-apple

Speaking of butter…I just want to say butter is simply the best. It is fundamental to baking and makes everything taste better. For greater exposition on this, I defer to the kitchn. Butter also reminds me of my Papa; he was repulsed by it. Just the sight of it would cause him to make some remark and/or facial expression of disgust. We grandchildren would taunt him by slathering butter on our corn on the cob say, “Oh Papa, doesn’t this look sooooo good? Do you want us to pass the butter?” But that was all in good fun and he knew it. We made sure any dish we prepared for him was butter free. If we tried to deceive him and the truth was found out, he would have never trusted us to cook the offending dish or anything that could possibly have butter, for him ever again. Recently my Grams confided in me that in later years she would sometimes sneak butter in her cooking and baking. And my Papa would remark that the food tasted really good, better than he remembered. Butter does really make everything taste better.

butter-delicious-unsalted-organic-kirkland

apple-gelette-cinnamon-sugar
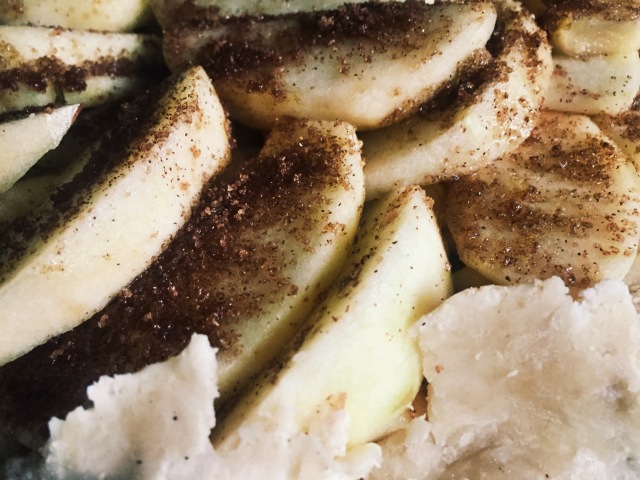
As far the apples go, we veered slightly from the original recipe and used two golden delicious apples and two honey crisp apples, the recipe calls for four golden delicious apples. Both are great for baking (and just plain snacking) because of their firm texture and sweetness. One of the great things about autumn in Michigan is that fresh, local apples are readily available.

apple-gelette-honeycrisb-michigan        fresh-michigan-golden-delicious-apple

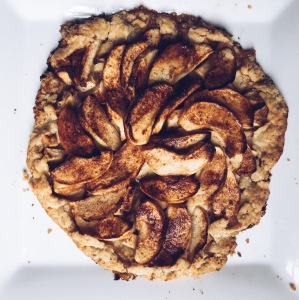
On the whole, our recipe mash up yielded a delicious galette. However, when making this again we would tweak a few things, primarily the quantity of dough used.  The crust recipe we used is for a double crust and we used half the dough, a single crust. However, it wasn’t quite large enough to accommodate the full four apples called for in the galette recipe (though the apples we used were on the large side). When the two crust recipes are compared, it is clear that a single crust isn’t quite enough. Even though we didn’t use all the apples, we still slightly over filled our galette; which resulted in some of the apples on the top getting dried out. Despite it’s short comings, our galette was a huge hit and was quickly devoured. Not too shabby for our first attempt.

Oh Hey, it’s October!

october-outside-oxfords-trees

Happy Monday everyone!  It was chilly and rainy all weekend, so I spent the majority of it just hanging out with the family aka being lazy.  Here’s a little bit of what I’m looking forward to this month.  Enjoy!

harvest-autumn-fall-pumpkins-colors-palette-inspiration

these gourds.

apple-cranberry-pandowdyi think i’m gonna bake this

poplar-trees-northern-oregon

Still waiting on the fall color to arrive in Michigan.  So i think i’ll go here instead.

wedding-portrait-animal-masks-rabbit

It’ll be our third wedding anniversary this month.

via jlbwedding

madewell-black-white-dress

this outfit

All the plaid.  I’ll take one of each please | It’s Le Crueset’s 90th anniversary | these loafers | fuuuuuur division | more plaid |

The Pursuit of Pita

pita-bread-recipe

Living in Metro Detroit we are never too far away from fresh baked pita perfection, either directly from a bakery or at the grocery store. However making our own seemed like the Martha thing to do…

Bread baking is something that I have always found intimidating.  I know those whom are seasoned in the craft tout how easy and simple it is, but the seemingly mystical properties of yeast, fear of over kneading the dough, and the time commitment have held me back.  In what seems like ages ago, I did try making pita, though only a few of my loaves came out of the oven with somewhat of the characteristic pocket, the loaves were still had a light and tender consistency. Even  though making my own bread did give me a sense of accomplishment, the time and effort did not seem to justify the end result, so I have not attempted it since, until now. Kristin and I were not quite sure what to expect in our pita making adventure, but armed with Martha’s recipe, we forged ahead…In Martha We Trust.

As we went through the bread making process, all seemed to be going according to plan. However when the moment of truth arrived, baking the bread that is, it was clear we fell short of our goal.   The bread failed to significantly puff up and took much longer than the total of 3 minutes specified in the recipe to turn golden in  spots. We continued with the rest of the loaves, hoping we maybe, just maybe could get a few to turn out. Alas, we had a Martha Fail on our hands. Five hours of our day gone, all for naught.

I wouldn’t characterize our results as leaden; however, the bread was very dense and chewing it did give our jaws a workout. When dropped on the table from a height of approximately a foot, it landed with a clear thud. Luckily we were able to pick up some proper pita at New Yasmeen Bakery (along with some amazing baklava).  Our husbands tried to ease our disappointment with proposing other ways to serve the bread, but their solutions seemed half baked (pardon the pun). Kirsten’s husband Carl noted that the bread seemed to have an never ending capacity to absorb moisture, but still remain dry.

In a post mortem analysis of our “pita” it became clear we were doomed from the start…

Processed with VSCOcam with a6 preset

I inquired to Google “why is my bread so dense?” and the answer resoundingly was too much flour. After examining other pita bread recipes, it became clear that for the amount of flour and yeast that was used we should have either made loaves with a greater diameter (8 to 10 inches) or make quite a few more 6 inch loaves. Now that  we know the error of our ways, we are considering a do over on the pita bread and welcome any recipe recommendations or technique tips. However, we are not sure as to when we will give it another try. Aside from our pita problems, the rest of the dinner was a delectable success and we’ll be sharing pictures and recipes with you soon.

Pita Bread recipe 

via Martha Sterwart

Prep: 1 hour 30 min Total Time:  3 hours  Yield: makes 16

Ingredients:

4 1/2 cups all-purpose flour, plus more for dusting

2 packages (1/4 ounce each) active dry yeast (4 1/2 teaspoons)

1 tablespoon honey

2 1/4 cups warm water (110 degrees)

1 1/2 cups whole-wheat flour

1 tablespoon coarse salt

1/3 cup extra-virgin olive oil, plus more for bowl

Fine cornmeal, for sprinkling

Directions:

Making the dough

  1. In a large bowl, whisk together 1 cup all-purpose flour, yeast, honey, and 1 cup warm water until smooth. Cover with plastic wrap; let rise in a warm spot until doubled in bulk, about 30 minutes. Stir in remaining 3 1/2 cups all-purpose flour, whole-wheat flour, salt, oil, and remaining 1 1/4 cups warm water.

  2. Transfer dough to a lightly floured work surface. Knead, dusting hands and work surface with more flour as needed, until smooth and elastic, about 10 minutes. Transfer to a large oiled bowl, turning to coat. Cover and let rise again until doubled in bulk, about 45 minutes.

Form and bake the dough

  1. Punch down dough and form into a ball, then turn out onto lightly floured surface.

  2. Quarter dough. Working with one piece at a time (drape a kitchen towel over the rest), divide each into 4 smaller pieces.

  3. Roll each piece into a ball and pinch, tightening ball. Turn pinched-side down and flatten with your palm.

  4. Flatten each ball into a 6-inch round with a lightly floured rolling pin.

  5. Transfer rounds to rimmed baking sheets sprinkled with cornmeal; drape with kitchen towels. Let stand 30 minutes.

  6. Meanwhile, preheat oven to 500 degrees with a rimmed baking sheet (flipped upside down) on rack in lowest position. Place 4 dough rounds on preheated sheet. Bake until puffed, about 2 minutes. Flip and bake until golden in spots and just cooked through, 1 minute more. Transfer to a basket lined with a kitchen towel; cover to steam and keep warm. Bake remaining pitas.